

Drawing animals can seem intimidating at first, but with a clear guide, anyone can create fun, detailed sketches. One of the most popular creatures for Halloween, fantasy art, and even biology projects is the bat. If you’ve ever wondered how to draw a bat, this tutorial will walk you through easy steps, tips, and variations to help you master it. Whether you’re a beginner or just looking to sharpen your skills, you’ll find this guide simple yet creative.
Why Learn How to Draw a Bat?
Bats are fascinating animals with their unique wings, nocturnal habits, and mysterious reputation. Drawing them can be a fun activity for:
- Halloween decorations
- School art projects
- Fantasy or comic illustrations
- DIY crafts
If you already enjoy creative projects like building a house fairy garden, learning to sketch bats can be another way to add whimsy to your artwork.
Step-by-Step Guide: How to Draw a Bat
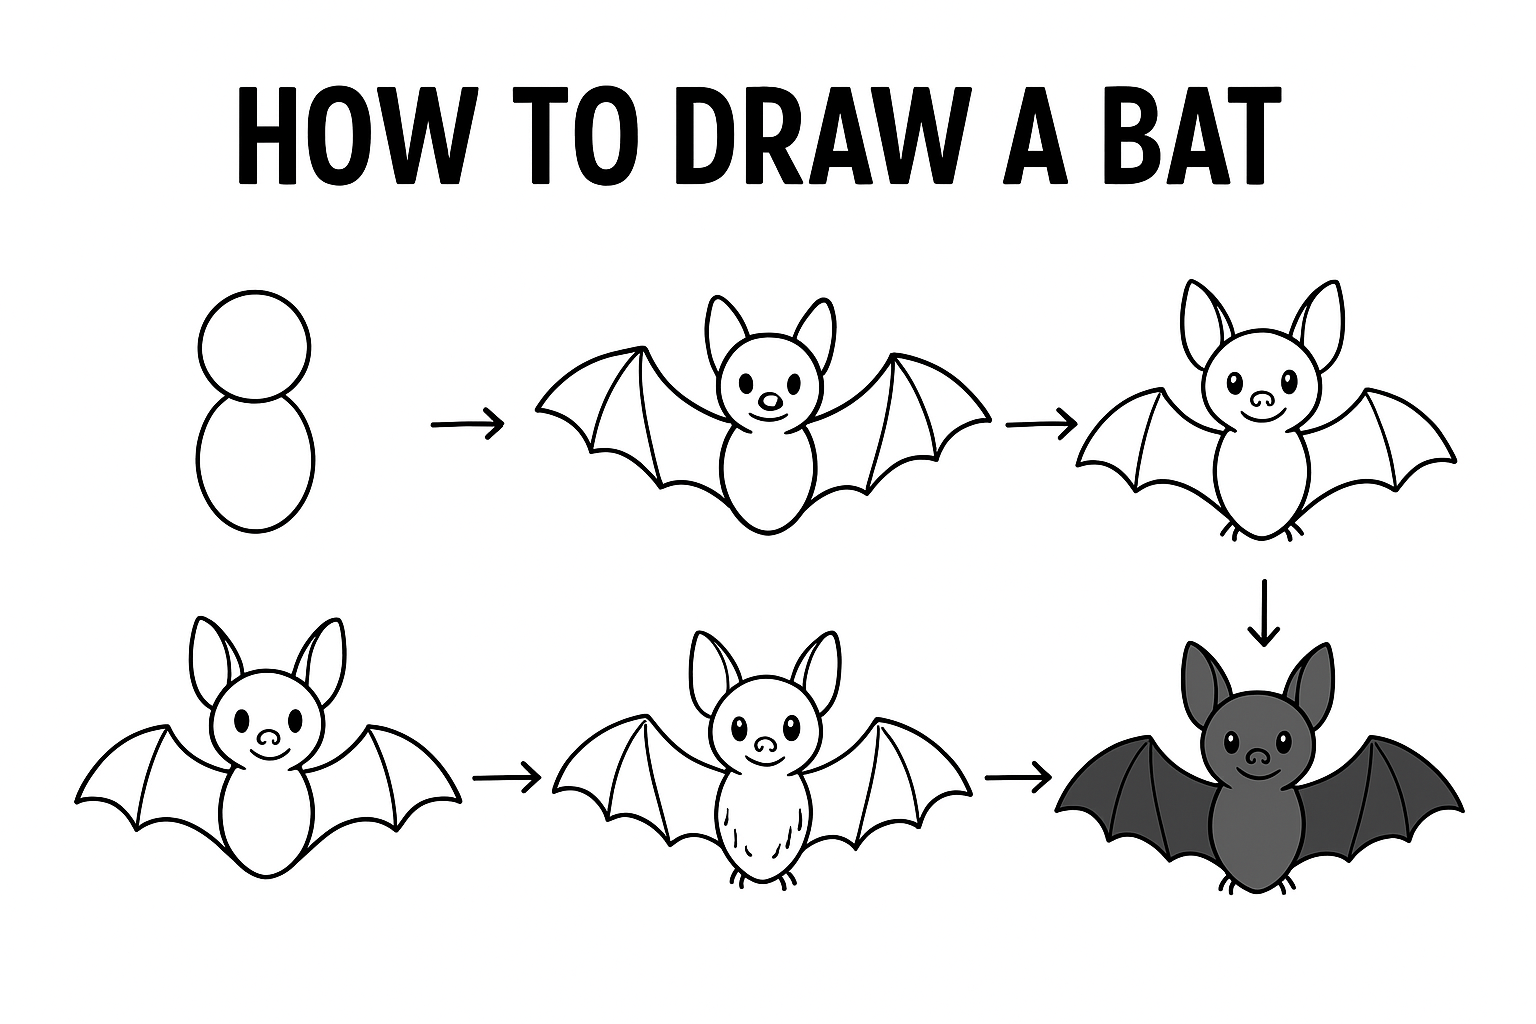
Step 1: Start with the Body
Draw a small oval shape for the bat’s body. This will be the center of your drawing.
Step 2: Add the Head
On top of the oval, sketch a smaller circle for the head. Add two pointed ears — bats’ ears are a signature feature.
Step 3: Draw the Wings Framework
From each side of the oval body, extend curved lines outward, almost like a stretched umbrella. These will serve as the “bones” of the wings.
Step 4: Shape the Wing Membranes
Connect the curved lines with swooping arches, forming the bat’s signature wing membranes. Think of a scalloped pattern.
Step 5: Add Facial Features
Draw two small eyes, a nose, and a tiny mouth. You can choose a realistic bat look or go for a cute cartoon version with big eyes and a smile.
Step 6: Add Details
Enhance your drawing with details such as claws at the wingtips, fur texture on the body, and shading to give it depth.
Step 7: Final Touches
Trace over your sketch with a darker pen or marker. Erase unnecessary pencil lines and add shading or color to finish.
Variations of Bat Drawings
- Cute Cartoon Bat: Exaggerate features like big round eyes, chubby cheeks, and tiny wings.
- Halloween Bat Silhouette: Focus on the bat’s outline with solid black shading. Perfect for decorations.
- Realistic Bat: Pay close attention to wing structure, fur texture, and proportions.
- Fantasy Bat: Add creative touches like glowing eyes, mystical colors, or magical surroundings.
Tips for Beginners
- Use light strokes first so you can easily erase mistakes.
- Look at real bat photos to better understand their anatomy.
- Practice wing shapes separately before adding them to the body.
- Experiment with shading to make the bat look more three-dimensional.
Creative Projects with Bat Drawings
Once you’ve mastered how to draw a bat, you can use your art in other DIY activities:
- Create spooky wall art for Halloween.
- Print your bat designs on stickers or T-shirts.
- Use them in mixed-media projects, much like you would with a cardboard gingerbread house craft.
FAQs About Drawing Bats
Q: Is it hard to draw a bat?
Not at all! With step-by-step guidance, bats are surprisingly easy to draw.
Q: What’s the best medium for bat drawings?
Pencil is best for beginners, but you can also use markers, watercolors, or digital tools.
Q: Can kids learn to draw bats?
Yes — the simple oval-and-arches method makes this a child-friendly art activity.
Conclusion
Learning how to draw a bat is not only fun but also a great way to practice curves, shapes, and shading techniques. Whether you prefer cute, spooky, or realistic versions, this simple guide helps you capture the unique charm of bats. With just a pencil, some imagination, and a few minutes of practice, you can create a bat sketch that’s ready for school projects, Halloween decorations, or even your next DIY craft.
So grab your sketchbook — your bat masterpiece is waiting to take flight!