

Introduction
If your whiteboard looks dull, streaky, or covered in faint old writing that refuses to disappear, you’re not alone. Over time, even the best boards can lose their shine from residue buildup, dust, or improper cleaning habits. Knowing how to clean a whiteboard properly doesn’t just make it look fresh — it extends its lifespan, keeps your ideas clear, and maintains a professional look whether it’s in your classroom, office, or home workspace.
This guide walks you through everything from daily cleaning to full restoration, using methods that are safe, simple, and proven to work.
Why Whiteboards Get Dirty Over Time
A whiteboard is designed to handle constant writing and erasing, but with repeated use, leftover ink particles and marker residue start to cling to the surface. This leads to what’s known as ghosting — faint stains that stay visible no matter how much you wipe.
Common causes include:
- Using permanent or low-quality dry-erase markers
- Cleaning with paper towels or rough fabrics that scratch the surface
- Skipping regular deep cleans
- Using too much cleaner without wiping it dry afterward
Learning the right way to erase a dry erase board and using the proper tools can help you prevent ghosting before it starts.
Step-by-Step: How to Clean a Whiteboard Properly
Cleaning a whiteboard correctly is about technique, not force. Here’s the ideal method to bring back that spotless shine:
Step 1: Gather Your Cleaning Supplies
You’ll need:
- A soft microfiber cloth or lint-free towel
- Isopropyl alcohol (70% or higher) or a dedicated whiteboard cleaner
- Dry-erase eraser
- Optional: vinegar, baking soda, or magic eraser for tough stains
Step 2: Erase All Writing First
Start by using your eraser to remove as much marker residue as possible. If you notice faint marks, don’t press harder — that can spread the ink instead of lifting it.
Step 3: Apply Cleaner
Lightly dampen your cloth with isopropyl alcohol or a store-bought whiteboard cleaner. Never spray directly onto the board, as excess liquid can seep into the corners and warp the material.
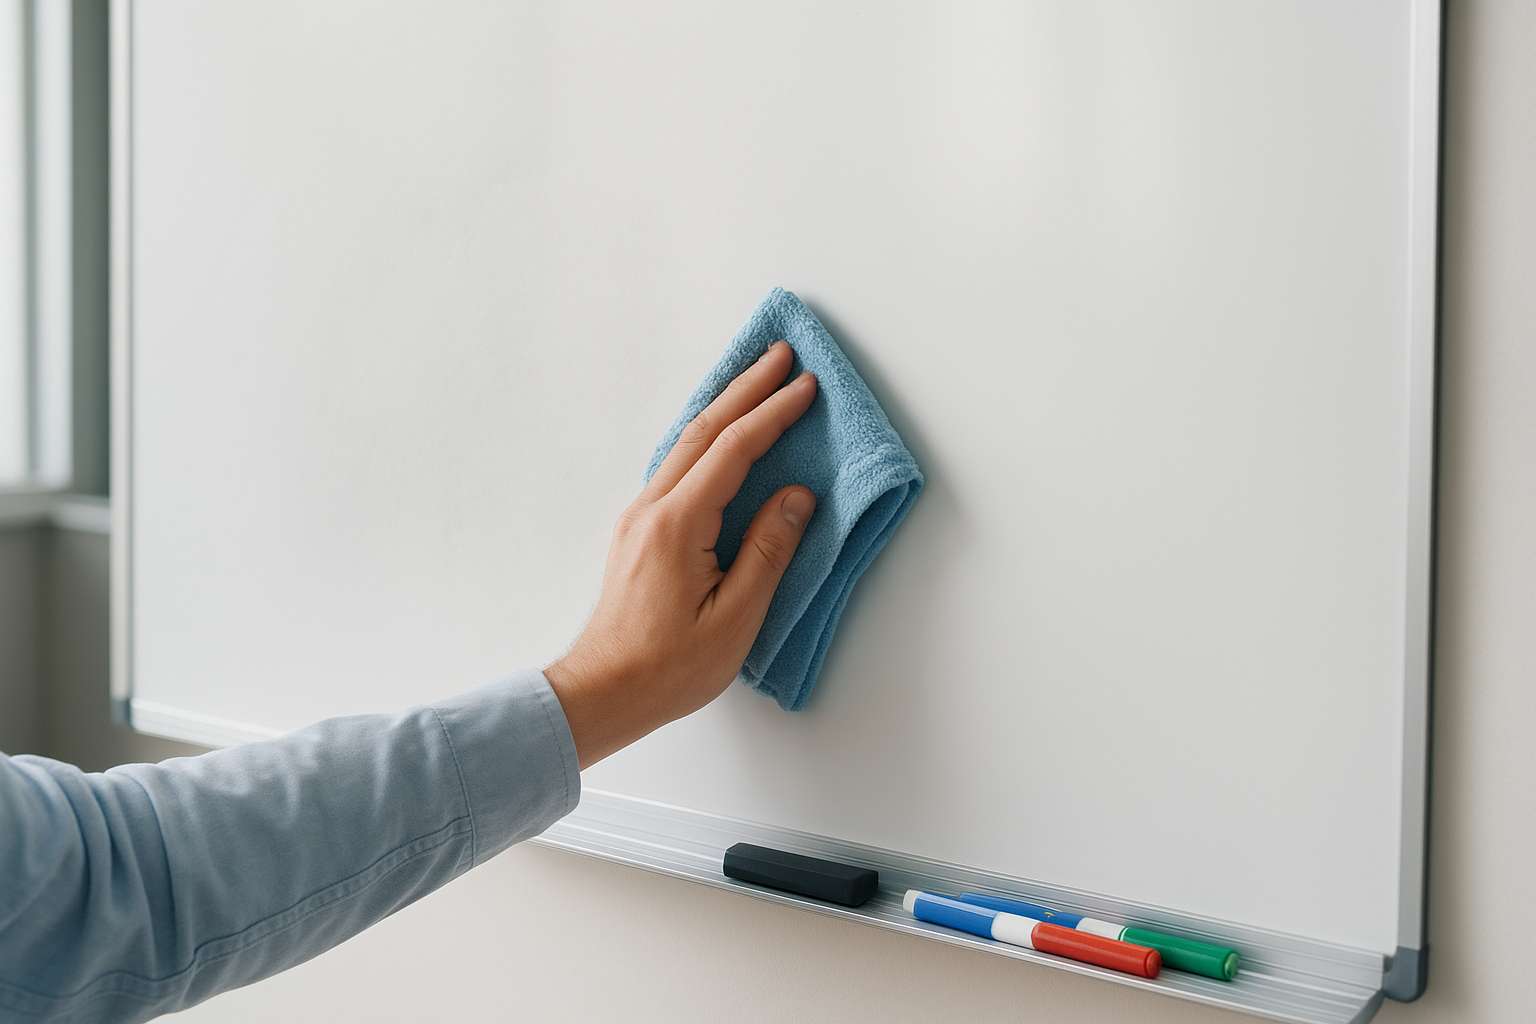
Step 4: Wipe Gently in Circular Motions
Wipe the surface in slow, circular motions. This lifts off residue evenly and prevents streaks. Avoid paper towels — they can leave lint behind and dull the surface.
Step 5: Dry and Buff
Use a separate dry cloth to polish the board afterward. The shine you see isn’t just aesthetic — it’s what helps future marker ink glide smoothly.
Pro Tip: If you want to know how to clean a whiteboard without damaging it, always test a small area first when using any new cleaner.
Home Remedies for Whiteboard Cleaning
Commercial cleaners are convenient, but household alternatives work just as well. Here are some effective options:
- Rubbing Alcohol: The go-to for removing oil-based residue. Wipe with a microfiber cloth and let air dry.
- Vinegar and Water (1:1): Natural and streak-free, ideal for quick weekly cleaning.
- Baking Soda Paste: Mix with water for deep-cleaning stubborn stains.
- Magic Eraser: A gentle scrubber that helps renew glossy finishes — just don’t overuse it, as it can be mildly abrasive.
These methods are great if you’re looking for eco-friendly ways to clean a dry erase board using materials you already have.
How to Restore a Whiteboard That’s Stained or Ghosted
If your board still looks cloudy after cleaning, it might need restoration rather than routine care. Here’s how to restore a whiteboard to near-new condition:
- Deep Clean with Alcohol: Wipe the board thoroughly, then let it sit for 5 minutes.
- Buff with Magic Eraser: Remove any ghosting gently.
- Recondition the Surface: Apply a small amount of whiteboard conditioner (or a few drops of baby oil) and spread evenly with a soft cloth. This fills in micro-scratches and restores gloss.
- Avoid Overuse of Harsh Cleaners: Continuous use of strong solvents can strip the protective layer, reducing longevity.
When ghosting becomes impossible to remove, it may be time to replace the surface — especially if it’s a low-cost melamine board rather than a porcelain or glass one.
Preventive Care: Keep Your Whiteboard Clean Longer
The best way to deal with stains is to stop them from forming. Here’s how to keep your board spotless longer:
- Clean Weekly: A light wipe with vinegar or cleaner prevents residue buildup.
- Use Quality Markers: Stick to known brands of dry-erase markers; cheap ones often contain dyes that stain.
- Store Markers Horizontally: This prevents ink pooling and streaky writing.
- Clean the Eraser Too: Dust and ink buildup on erasers can transfer back onto the board.
- Avoid Overwriting: Don’t write over faint marks — it only seals the old ink deeper into the surface.
Proper erasing of dry erase boards and gentle maintenance can easily double the life of your whiteboard.
Eco-Friendly and Budget Cleaning Options
For those who prefer sustainable methods, you can maintain your whiteboard effectively without commercial chemicals:
- Reusable Microfiber Cloths: Replace disposable wipes and reduce waste.
- Homemade Vinegar Spray: Mix equal parts vinegar and water, store in a spray bottle, and use weekly.
- Lemon Juice Mix: Natural disinfectant that adds a pleasant scent.
These are cost-efficient and planet-friendly — perfect for schools and offices focused on green cleaning practices.
Common Mistakes to Avoid When Cleaning a Whiteboard
Even with the best intentions, small cleaning mistakes can damage your board’s finish:
- ❌ Using paper towels or tissues — they leave lint and cause scratches.
- ❌ Applying too much cleaner — oversaturation can warp or discolor the surface.
- ❌ Forgetting to dry — moisture leads to streaks and ghosting.
- ❌ Using glass or window cleaner — it contains ammonia that can dull the board permanently.
If you ever wonder how to clean dry erase board surfaces safely, remember: gentle motions, minimal moisture, and soft materials are the golden rules.
Quick Comparison Table
| Method | Best For | Frequency | Pros | Cons |
|---|---|---|---|---|
| Isopropyl Alcohol | Everyday marks | Weekly | Fast, effective | Strong smell |
| Vinegar + Water | Light dirt | Weekly | Eco-friendly | May streak slightly |
| Magic Eraser | Deep stains | Monthly | Restores shine | Slightly abrasive |
| Commercial Cleaner | Regular maintenance | Weekly | Streak-free | Slightly costly |
Conclusion
Learning how to clean a whiteboard isn’t just about aesthetics — it’s about preserving a valuable communication tool. With the right cleaning habits, your board can stay spotless, ghost-free, and ready for inspiration at any moment.
Regular care keeps the surface glossy, your writing legible, and your ideas clear — all while saving you from premature replacements. So grab that cloth, ditch the paper towels, and give your whiteboard the care it deserves.